 |
HP Laserjet P1102W Manual |
Power save with the most energy-efficient laser printer, you should use only genuine HP toner in HP printers for a good result, even though printing
Front and left side view
- Output bin
- Foldable output tray extension
- Input tray
- Short media extender tool
- Power button
- Print-cartridge door lift-tab
- Control panel

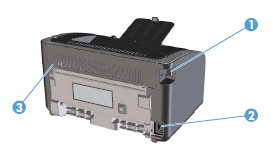
- USB port
- Power connector
- Kensington lock
- Attention light: Indicates that the print cartridge door is open or other errors exist.
- Ready light: When the product is ready to print, the ready light is on. When the product is processing data, the ready light blinks.
- Wireless button: To detect wireless networks, press the wireless button. This button also enables and disables the wireless feature.
- Wireless light: When the product is searching for a network, the wireless light blinks. When the product is connected to a wireless network, the wireless light is on.
- Attention light: Indicates that the print cartridge door is open or other errors exist.
- Ready light: When the product is ready to print, the ready light is on. When the product is processing data, the ready light blinks.
- Cancel button: To cancel the print job, press the cancel button. Press and hold the button for 5 seconds to print a configuration page.
Supported operating systems for Windows
The product comes with software for the following Windows operating systems:- Windows Vista (32-bit and 64-bit)
- Windows XP (32-bit and 64-bit)
- Windows 7
- Windows Server 2003 (32-bit and 64-bit)
For more information about upgrading from Windows 2000 Server to Windows Server 2003, using Windows Server 2003 Point and Print, or using Windows Server 2003 Terminal Services and Printing, go to www.microsoft.com.
- Windows Server 2008 (32-bit and 64-bit)
Supported printer-drivers for Windows
The product comes with software for Windows that allows the computer to communicate with the product. This software is called a printer driver. Printer drivers provide access to product features, such as printing on custom-sized paper, resizing documents, and inserting watermarks.Note :
The most recent drivers are available at www.hp.com/support/ljp1100series. Depending on the configuration of Windows-based computers, the installation program for the product software automatically checks the computer for Internet access in order to obtain the latest drivers.
In addition to the printer driver that is installed from the product CD, the XML Paper Specification (XPS) driver is available for download from the Web.
Priority for print settings
Changes to print settings are prioritized depending on where the changes are made:Note :
The names of commands and dialog boxes might vary depending on your software program.
- Page Setup dialog box: Click Page Setup or a similar command on the File menu of the program you are working in to open this dialog box. Settings changed here override settings changed anywhere else.
- Print dialog box: Click Print, Print Setup, or a similar command on the File menu of the program you are working in to open this dialog box. Settings changed in the Print dialog box have a lower priority and usually do not override changes made in the Page Setup dialog box.
- Printer Properties dialog box (printer driver): Click Properties in the Print dialog box to open the printer driver. Settings changed in the Printer Properties dialog box usually do not override settings anywhere else in the printing software. You can change most of the print settings here.
- Default printer driver settings: The default printer driver settings determine the settings used in all print jobs, unless settings are changed in the Page Setup, Print, or Printer Properties dialog boxes.
Change printer-driver settings for Windows
Change the settings for all print jobs until the software program is closed
- On the File menu in the software program, click Print.
- Select the driver, and then click properties or Preferences.The steps can vary; this procedure is most common.
Change the default settings for all print jobs
- Windows Vista and Windows 7: Click Start, click Control Panel, and then in the category for Hardware and Sound click Printer. [or] Windows XP, Windows Server 2003, and Windows Server 2008 (using the default Start menu view): Click Start, and then click Printers and Faxes. [or] Windows XP, Windows Server 2003, and Windows Server 2008 (using the Classic Start menu view): Click Start, click Settings, and then click Printers.
- Right-click the driver icon, and then select Printing Preferences.
Change the product configuration settings
- Windows Vista and Windows 7: Click Start, click Control Panel, and then in the category for Hardware and Sound click Printer. [or] Windows XP, Windows Server 2003, and Windows Server 2008 (using the default Start menu view): Click Start, and then click Printers and Faxes. [or] Windows XP, Windows Server 2003, and Windows Server 2008 (using the Classic Start menu view): Click Start, click Settings, and then click Printers.
- Right-click the driver icon, and then select Properties.
- Click the Device Settings tab.
Remove software for Windows
Use the uninstall utility to remove Windows software- Click the Start button, and then click the Programs or All Programs menu item.
- Click the HP menu item, and then click the HP LaserJet Professional P1100 Printer series menu item.
- Click the Uninstall menu item, and then follow the onscreen instructions to remove the software.
Windows XP, Windows Server 2003, and Windows Server 2008
- Click the Start button, click the Control Panel item, and then click the Add or Remove Programs item.
- Find and select the product from the list.
- Click the Change/Remove button to remove the software.
Windows Vista and Windows 7
- Click the Start button, click the Control Panel item, and then click the Programs and Features item.
- Find and select the product from the list.
- Select the Uninstall/Change option.
Download HP Laserjet P1102w printer driver complement your needs completely and perfectly as you need


